So I found a reference for an old doorway that I liked and started modeling it while I was at work during downtime way back in January of 2015.
I got about as far as doing the outer stone arch, the inner arch, and the door itself before I became distracted by other things -- which is everything you see below...minus the effigy :)
When I found the doorway project, I immediately had the idea of glowing runes to ward away evil. From that point, I took the outer stone arch and brought it into Substance Painter to mess around with emissive maps. I liked the results but I needed some good looking runes to actually make it look awesome -- so I decided to try making my own.
I did so by taking a chalk brush and adding a bunch of jitter effects, then painting random curves and shapes. After about 10 or so pages, I went back with a hard eraser and broke up the shapes. I ended up with several pages of pretty excellent looking runes and chose these 9 for this project
The results with the runes on the archway were pretty awesome. This was the point at which I was committed to completing the doorway.
The next thing I worked on was the inner arch. After getting a base texture down and painting in some custom grime, I found there was a huge blank area that was screaming for something to make it more interesting.
Elder Scrolls Online has been my game of choice lately and I was impressed by the visage of Molag Bal in Coldharbour -- ESO is also fairly heavy in glowy runes :)
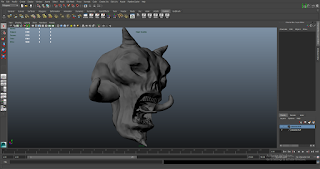
So I thought if this doorway were meant to ward off evil, then there should be a representation of that evil present to give direction and shape to the warding spells. So I dove into Zbrush and started sculpting. Eventually a demonic face began to take shape and I added horns with the points in the shape of an upside down pentacle -- also, the demon face kinda reminds me of the original Doom demons!
This was my first serious attempt in a long while at retopping. I also learned that next time, instead of trying to bake normals from a concave model, I'm going to simplify the silhouette as much as possible. As you can see I had a lot of issues with the demon mouth. If it were not going to be a metallic effigy covered in rust and corrosion, I'd go back and fix it -- for now I'll let it ride and see what it looks like at the end.
And after a quick smart material in Substance Painter:
Next I needed to create a mount for the demon head on the inner arch, but I wanted to do so using a normal map rather than modeling. So I popped into Substance Designer and created a basic, demonic emblem shape and stenciled it onto the asset in Substance Painter as well as some more of those glowy runes:
Now my most complex piece to date; the stained glass window. I decided to use the modeled door decor to test out thickness maps mixed with emissive maps. I've never done a thickness map before so it will be a process I'm sure. I started by finding some stained glass door designs that I liked and using them as reference. Then I created a template in PhotoShop.
Unfortunately I didn't grab the UVs from Maya to reference the scale of the window to the actual modeled piece, so I'm hoping that I can adjust the model itself to fit the texture later. If not, well, sadface; because this process has been the most work on this project so far and re accomplishing it will suck.
I also wanted to pay particular attention to the glass texture as the light reflectance will play a big part in making this look believable. So I found a reference and went into Substance Designer to create a couple of variations.
Which I then used as stencils to paint on different pieces of glass. The result as far:
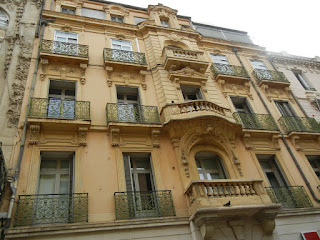
So this is my current progress update. I will have more as I wrap this up but I wanted to get a blog update logged since I've been having so much fun working lately and because I've been gone for so long. Next I'll be finishing the door to include a door knob, modeling a couple of pillars and a street lamp to use as a light source, and then plugging it all into Marmoset for some final renders. I plan on further expanding this project to flesh out the reference image below that was taken by my old boss and friend, John Hancock. The image is from Paris, France.
Thanks for taking the time to give this a read and I'll have another post for you guys as well as a portfolio update in the next couple weeks!


