Monday, August 4, 2014

Wagon Wheel prop -- My new workflow from start to finish

Hola my friends!

So last post I started playing around with Substance Painter to texture the barrel prop I'd made -- this time my focus was to create and refine my workflow using only Maya, xNormal, Bitmap2Material (B2M), Substance Designer (SD), Substance Painter(SP), and PhotoShop.  While I am nowhere near to mastering this workflow or the tools entirely, I can say for sure that anything I need to accomplish I can do so with just these tools -- hoorah.

This is the final product, rendered in Marmoset 2.  I've discovered that SP's included post rendering software, Yebis, actually looks better than Marmoset.  The only reason I didn't take screen renders directly from SP is because my texture file got corrupted.  Luckily I had exported some test bitmaps but was unable to complete the texturing process as I would've liked.  SP is still in Beta testing phase so I'm not particularly surprised nor frustrated, at least I got the test bitmaps out of it!.  Next project I'll have a finalized textured item and be taking screen renders from within SP if my file remains untainted  :)


The workflow on this project was, in order listed:
- Research and data collection
- Maya:  Blockout, HP modeling (prop and kit-bash assets), LP modeling, UV unwrapping, transfer map setup, .obj and .fbx exports.
- xNormal:  HP to LP normal baking.
- Substance Designer:  Curvature and AO baking.
- PhotoShop:  Compile and edit base texture library
- Bitmap2Material:  Adjust texture properties; normal, height, etc, bake tileable diffuse, height, roughness, metallic stencil .jpgs.
- Substance Painter: All texture painting and post processing (ideally).
- Marmoset 2 (as backup):  Image renders.

Research:
I wanted to get a basic idea of the wheel structure and texture so I did a little research online and found some base textures from www.cgtextures.com.


And the base textures from www.cgtextures.com


Unfortunately I didn't get around to accenting the metal with the copper texture before my file got corrupted, but there it is anyway.

After studying these and other research images online, I began the blockout phase of the wheel.  I started with the Hub, then created a single Spoke, and a single section of the wood rim.  I then duplicated the original spoke and rim portion and rotated them my 30 degrees to either side and then build the steel wheel section on top of those.  This ended up being much more difficult than I originally thought because as I began to duplicate the spoke and rim portions of the wheel, I found that my math wasn't adding up for it to match up exactly -- causing much heartache later on in the project.

So I've decided that eventually I will retake some basic math courses, particularly geometry and calculation classes -- maybe even delving into some architecture eventually and save myself future pain, suffering, and time.

After creating the blockout I jumped right into HP modeling.  I ended up with some pretty horribly translated edges on my normal map though and I think it's because I forgot to duplicate my original blockout mesh and instead, modeled my LP from scratch in orthographic views.  This cost me both time and quality.

HP Wheel Hub mesh modeled half at a time


Finished HP Wheel Hub

Wheel Spoke

 Wooden Rim

 And assembly duplication


Then outer steel wheel portion

Next I started a mini hardware kit to plug into the model for normal map information


 And plugged them in


I made adjustments to the HP mesh to get rid of 90 degree angles

And then modeled the LP version starting with the Hub

 then the Spokes and Rim


Next I UV unwrapped and exported the LP version in .obj for xNormal baking and .fbx for everything else.
I opted to texture just a single portion of the wheel to allow for maximum texture quality and to save time.

I also exported a plane and the kit-bash hardware and baked them in xNormal so that I could add in some of the bolts on the wooden rim in PhotoShop as they were too large to bake with the HP mesh

I then took the normal map and LP mesh into Substance Designer and baked AO and Curvature maps


Now that the mesh and base curvature, normal, and AO information was built I moved onto editing and preparing my diffuse textures.  Starting with the base textures I found in cgtextures.com, I edited out the bits and pieces I didn't want in PhotoShop like screws, scratches, bolts, etc and then saved the new images and imported them into Bitmap2Material.  One of the greatest things I found with B2M is that you don't even have to offset and tile your image in PhotoShop -- B2M tiles it for you automatically!  Good enough for stencils at the very least  :)  Not only does it do that, but you can then export Height, Normal, Specular, or any other information you want for your stencils to be used in Substance Painter.  Yeah, pretty incredible.

These are the final stencils with diffuse, height, and specular (if relevent) 512x512 maps:

Aged wood color

Aged wood height

Rusted metal color

 Rusted metal height

Rusted metal specular

Aged copper color

Aged copper height

Unfortunately I don't have any images of the work process in Substance Painter due to the corruption of the file, but I do have a couple different angled shots of the wagon wheel.  The last leg of finalizing the texture process though is to import the .fbx mesh, baked normal, AO, and curvature maps, and finally the diffuse, height, and specular texture maps.  Plug everything in as appropriate and begin texturing.


Considering how far Substance Designer has come and the incredible reduction in processing power as well as software stability, I really can't wait until Substance Painter is just as far along too  :)

The next prop to build is probably gonna be a grain sack or something else as simple and quickly attainable -- I spent a lot more time on this than I planned and PAX Dev is getting closer on the horizon.  Thanks for reading and I'll see you again soon!

Sunday, July 20, 2014

And we're back to the Watermill...

Hola  :)  Project Duality is losing a wee bit of momentum for the time being because we just can't seem to find a steady programmer.  So I'm going to take a break from trying my hand at things like programming and scripting and instead try to make some progress on my actual skill set.  Duality is still alive and well mind you, it's just taking a nap.

So it was suggested to me to pick up the Old Watermill project back from where I left off (thanks Rachael!) and I thought that was a great idea.  As it's been a little while since I last worked on it, I thought I should jump back into it by creating an environment prop asset list and get warmed up to art again on things like barrels, grain sacks, bear traps, etc.

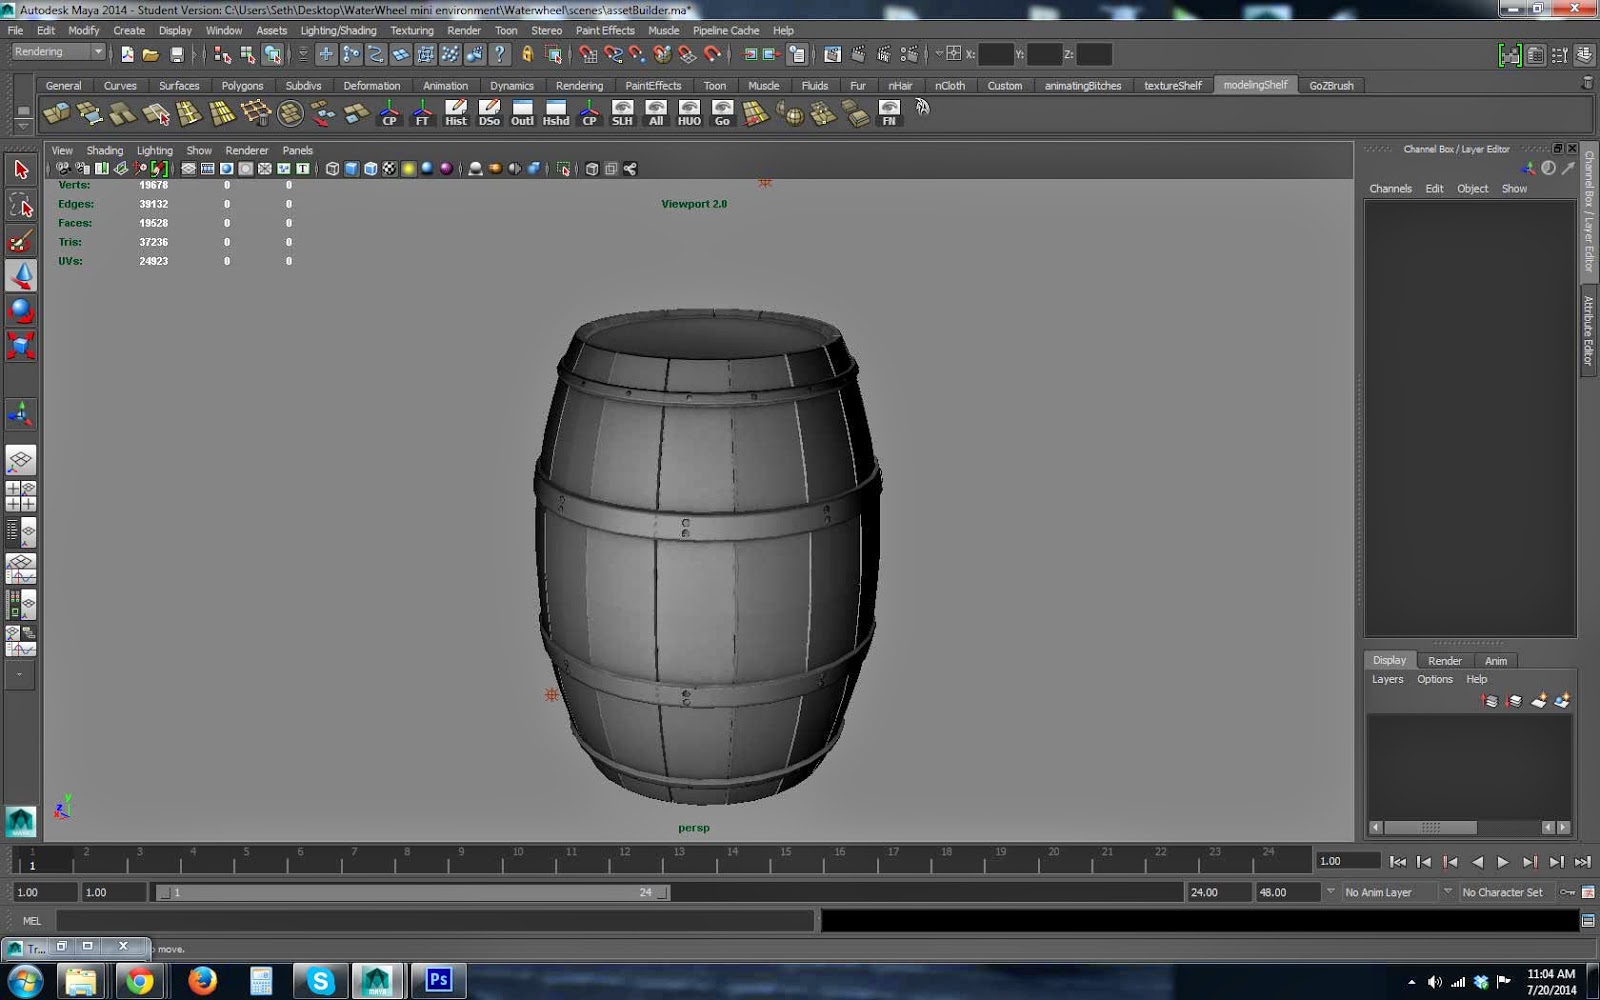
I decided the first asset to attack would be a simple barrel and I'm fairly pleased with the result:


My modeling skills are rusty but still very weak so I opted to model a High Poly barrel, transfer the Normal and AO maps in Maya, and then texture the Low Poly with Allegorithmic's Substance Painter, Substance Designer, and Bitmap2Material.  Have I ever mentioned how much I love Allegorithmic?  Yeah, they're awesome.

I won't bore you with the details of the modeling process since this is a pretty simple object.  Here is the High Poly version.


And the High Poly wireframe.  I did a mini kit-bash for the rivets after re-watching some great tutorials on 3dMotive.  I will be getting more in depth with that technique in future projects.

For the Low Poly I didn't bother re-topologizing because the object is so simple.  Instead I just modeled it in ortho view from a cylinder.

And wireframe.  A little heavy on the polys but meh.

Transfer mapping took me a couple hours to figure out good settings and to get the best UV unwrap to maximize my texture space.  This is the final HP Normal map.  There are some odd artifacts on the top and bottom of the barrel and the rivets kept baking into the Y plane of the metal bands.  I couldn't figure out how to stop that from happening completely, but I did reduce the problem by tightening up the Low Poly mesh to the High Poly.  I was taking too much time on it though so I eventually opted to move forward with texturing.

And the AO.

I purchased Substance Painter when the Beta was first released earlier this year but had yet to really dive into it.  This little project seemed like a great way to get my feet wet in learning the software and its possibilities.  After a few hours of tutorials and some research, I downloaded a couple textures from cgtextures.com, adjusted and tiled them in PhotoShop, refined and baked Diffuse, NRM, and Height maps in Bitmap2Material, and then imported them as stencils in Painter.

oldWood_Diffuse

 rustedMetal_Diffuse

And then Substance Painter: import

 After two passes at base texture and materials:

And a quick worn paint and dirt pass:

It took me 2 days to model, UV unwrap, transfer maps, and learn Substance Painter.  Actually texturing and taking Marmoset renders afterwards took only 2 hours.  I gotta say, I'm becoming an Allegorithmic fan-boy  :)  There's a good possibility that the 3 products I own from them will replace all other software in my pipeline with the exception of PhotoShop -- still gotta edit images...for now.

I will cobble together the maps I created for this asset in a finalized format soon, for now it's late and I gotta work early tomorrow.  Till then thanks for reading and it's good to be back!

Wednesday, May 14, 2014

New Job

Hola my friends,

If you hadn't heard I started a new job at Microsoft this Monday the 12th as a QA Tester.  It's the ground floor of the games industry but it IS the games industry so I'm quite excited!  I will be focusing on learning my job there for now and wanted to leave a record here as to why my blog entry frequency has suddenly taken a nose dive.  Now you know  :)

Thanks for your patience and support and I hope that what you've read here so far has been inspiring and informative!

Thursday, May 1, 2014

Unity vs. Unreal assets and their lighting problems

Hola folks!  As you know we went from Unity to Unreal 4 and we knew there was going to be some updating.  My biggest concern was getting our lighting to start working because it is going to be very important for our environment to light well both from in game light sources but also from the characters combat VFX that we have planned.

So when we brought our Unity modular pieces into Unreal and started messing with static lighting we found some pretty big problems.

Our original modular wall pieces

This was the result of baking out lightmaps in Unreal with those pieces


What ha-hap-happened was Unreal reads separate pieces of geometry as having AO between the pieces, no matter how close they are -- these are snapped together on the grid.  It also made me realize how much these walls don't look like a cave which is the initial environment the player finds him/herself in.  Instead they come off as concrete barrier pieces at a construction site.  There is also more baking at the base of the pieces where the floor plane meets.  Pretty ugly.

So with this I decided, first, to make more organic looking walls and appear more like they were carved out of a cave to create a temple type structure and, second, to make our 16x16 tile pieces solid geometry with as few seams between pieces as possible.  The fewer seams I have the less I'll have to hide with assets, decals and vertex painting.

The new modular floor and wall pieces are broken down into individual rooms and then compiled by our original naming convention: Lvl1F1T1(R1)


Still some lighting issues but nothing that can't be fixed!


So a quick rundown on the rebuilt assets.  As I mentioned before, once I brought the original walls into Unreal from Unity I realized they looked like crap.  This time I wanted to make them more organic and cave like that was carved and then smoothed by air and time.  So I started messing with the CV curve tool and lofting to create surfaces.  I finally ended up with 1 wall piece and 1 each outer and inner 90 degree corner. Shortly after I modeled a carved lightsource wall section -- all using the same original curve to maintain edgeloop continuity.

New modular wall pieces

I also created some better arch pieces and pillars to fit the new roomier level layout


To avoid having light baking issues like before, I decided to make the levels out of water-tight pieces of geometry.  Once my walls were setup, I used the Cut Faces tool in Maya to divvy up the original 16x16 plane


And the slicing begins

After that it was just a matter of fitting together, combining, welding, and edgeflow efficiency.


Total faces just over 5200.  I'm planning on revisiting these pieces to optimize as I get further in the project.  Until then I'm gonna hammer out some lighting, asset placement, and begin planning some VFX for the combat system currently being developed.  For now I'm pretty happy with the progress of this level piece from the original and am looking forward to putting together the rest of the pieces to see the level start to take more form.  Hoorah!


Thursday, April 24, 2014

Duality goes Unreal

Hola!  So we've been working in Unity for Project Duality and were about to subscribe to the pro version to begin implementing lighting and working on VFX; then we realized the difference in price and capability between that and Unreal 4.

Originally our purpose in using Unity was to learn the engine and because of the resources available for that. We also needed to have a highly accessible platform for us to work with.  This last reason has become especially important as our team has grown by a few heads.  Once we started getting to the point that we needed to look into committing to and investing in the engine, we realized that we were going to need more than just two licenses for James and I.  Unity is a great engine to work with, but at $75 a month per license (which we're still a little confused on how pricing for a team works exactly) and a commitment of 1 year minimum subscription, suddenly 2+ licenses was a little scary to sign up for.

As I'm sure you know, Unreal 4 was rolled out with an incredibly affordable subscription cost ($20 a month, cancel anytime, + 5% sales which we will prolly never have to pay anyway) and improved as well as new tools (yes, I'm looking at you Blueprints), with the same visual quality its always had.  Unreal is also an industry standard which, having a product built with it will improve our portfolios and, hopefully, chances of actually getting into said industry.  Also, the lighting capabilities of Unreal 4 is sexy as hell -- I like sexy.

So there it is; we've made the switch from Unity to Unreal and are very excited about it!  We are going to be making adjustments to our current assets and getting ourselves better acquainted to our shiny new toy so it may be a little bit till the next blog update.  Fear not my friends and peers, the juice'll be worth the squeeze.*

* 10 points if you know which movie that's from  :)

Sunday, April 20, 2014

Shiny stuff!

So the last couple weeks have been devoted building textures and modeling/uv unwrapping some assets to apply them to.  As you saw in the last post, I had some pretty basic models built already so there was already a baseline for me to work for texturing.

The Plan was to begin with creating 2 stone textures, one for assets and one for walls/floors (forthwith known as stoneAssets and stoneWalls) (forthwith heard).  I started off by building a template for a tileable stone texture in Maya and then exporting it into Zbrush for sculpting normal map information -- almost the exact same process as I explained in the Basement Stone texture for the Old Watermill below.  After that I also sculpted a quick tileable stone wall texture for normal map information as well.  When I finished with Zbrush, I imported the high poly meshes to Xnormal and extracted normal, AO, and height maps and a diffuse selection map in Maya for the stoneAsset texture.

After completing some pretty looking diffuse textures in PhotoShop, I imported the shiny new diffuse as well as the normal and height maps into Substance Designer where I generated spec maps as well as added wear and tear effects to both stoneAssets and stoneWalls.

stoneAssets Diffuse, Normal, Specular

stoneWalls Diffuse, Normal, Specular

After having some decent textures to work with, I went about uv unwrapping the assets and modular wall pieces.

Arches

archTypeA UV set

Pillars

largePillar UV set

tallPillar UV set

Sarcophagi

sarcophagiTypeA UV set

Modular Walls

It's pretty amazing what you can accomplish with just a few assets and a couple textures.  With these assets finally starting to look like something a little more interesting, I'll be plugging them into the Unity engine and begin working with lighting.  My goal is to have both static and dynamic lighting and to get more familiar with producing a finished lighting set up, including post processing.  I won't be working on assets anymore for the time being as I'm quite sure I'll be rebuilding everything after I better understand in engine lighting  :)

Till next time, stay classy

Friday, April 11, 2014

Project Duality

So the Old Watermill has taken a wee bit of a backseat to Project Duality for the time being.  The team has gone from just James Harris and I to James Harris and I + five and its really starting to take off.  We still have a long way to go certainly, but some major breakthroughs have happened and I wanted to document them here.

A brief synopsis of Project Duality quoted from our description on LinkedIn:

"A 3rd person bird's eye view Action/Adventure RPG in which the player explores two parallel worlds - phasing between both at-will to solve puzzles, combat enemies and bosses, and progress through levels.  Combat mechanics and art style is inspired by the classic Mana series that spanned from the SNES to the original Playstation and is very near and dear to our hearts.  This project will be a long work in progress and meant as a portfolio piece to showcase the teams talent and passion."


To date we've made 2 major breakthroughs:  Camera mechanics and production pipeline process.  Camera mechanics was our first major breakthrough and led to discovering our pipeline.

Originally we started with an isometric view with the camera centered on the player and this made the game feel completely removed from the Mana titles we are attempting to pay tribute to.  Our level development also felt very wrong -- Duality was becoming more like a tribute to Diablo or Baldur's Gate II (neither of which are bad mind you) and less like our beloved Mana games.

We went back to playing Secret of Mana and Secret of Mana 2 (Seiken Densetsu III) to regroup.  We discovered that these games, being 2D sprite based, are set up in grid chunks in which the camera is mostly on rails and advances only when the player breaks a threshold of screen space as they move forward through the level.  The camera doesn't follow the character as much as reveals the map as the character progresses and does not break the boundary of the level.  Example below:


So this led us to the idea of building our levels in square tiles and locking our camera to the level and advance only when the player breaks a certain threshold of screen space.  As we are building this game in Unity Engine and default units is in meters, we opted to build levels with 16x16 meter chunks with a level specific naming convention.

Which brings us to our pipeline process.  Being as we were now building levels on a square grid and that 16 is a power of 2, most of our future work is already simplified.  Texturing and maintaining texel density is a matter of division and asset scale and placement is extremely simple.  We also created a PhotoShop template with a 16x16 unit grid setup so all they have to do is draw a floor plan and export the .jpg to me and I can plug in the modular and custom assets accordingly.

Lvl1F1T1 floorplan jpeg from level designer


 Import to Maya

Extrude and create modular wall pieces

Place walls and ensure everything fits; adjust level floorplan as needed but maintain exit locations


Create environment assets from asset list

Plug in assets

This is the first floorplan of the first level and now that the modular assets are built, the rest of the level chunk iterations take a VERY short time to compile.

As of now we have 4 level chunks completed and this is enough space for our programmers to begin building the AI and combat systems James has designed as well as create and test our camera.  James has been focusing on updating documentation, organizing the team, and designing the elements our programmers need to get some testable gameplay going.  It will be a while until he can work on floor plans for the rest of the level and in the meantime I will be focusing on building tileable textures for the walls, floors, and environment assets.  I'll post progress on that front soon!